Tabular Editor 2’s CLI is often used in CI/CD pipelines (Azure DevOps, GitHub Actions, etc.) to perform certain tabular model related actions, such as running a Best Practice Analysis, performing a schema check or deploying the model to a destination server. The CLI was designed in 2016, before Power BI and even Azure Analysis Services had become mainstream, and this, unfortunately, means that the CLI is a bit dated when it comes to tabular model features introduced later on, especially with regards to implicit data sources introduced by Power BI. The good news is that the TE2 CLI can be used to execute custom C# scripts, and this turns the CLI into a super flexible tool that allows us to work around some of the limitations in its native use cases.
In this article, we present C# scripts that can be executed as part of the TE2 CLI, to perform various checks and model metadata alterations. These are:
- Schema Checks: We use a C# script to work around the limitations of the native TE2 CLI -SCHEMACHECK option
- Updating Data Source References: We use a C# script to change connection settings for data sources on-the-fly before deploying.
- Adding Role Members: We use a C# script to add security role members on-the-fly before deploying.
Schema checks
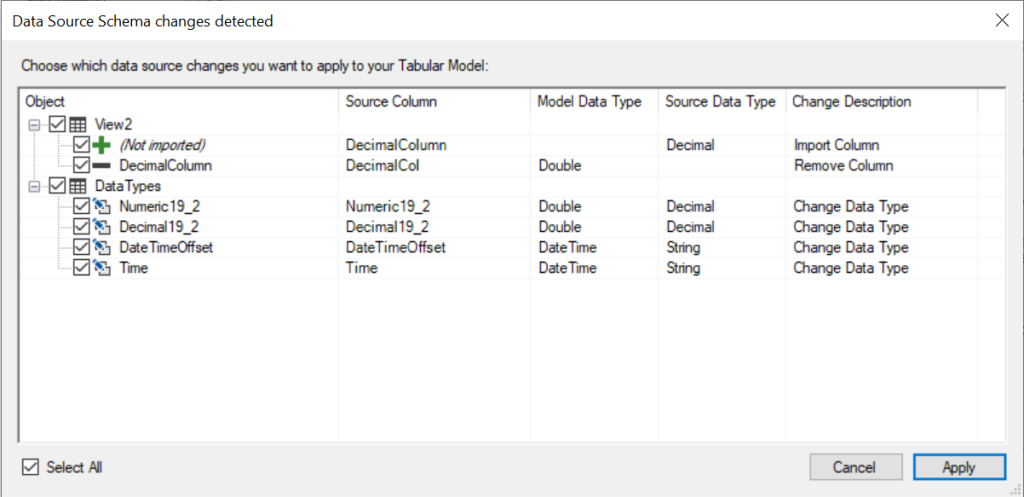
A schema check is useful to perform during build validation, for example when a Pull Request is submitted, to ensure that columns imported in the tabular model, match the schema (column names and data types) of the source table or view. If a column was removed or renamed in the source, but the corresponding column isn’t updated in the tabular model, this will likely cause an error when the model is subsequently refreshed.
On SQL Server 2016 Analysis Services, we only had one option for table partitions: Legacy (SQL). No M queries, structured data sources, implicit data sources, etc. Each table had one or more legacy partitions containing a SQL query which would be executed against the data source, to return the set of data to go into that partition. This meant that we could perform a schema check in Tabular Editor by simply opening a connection to the same source, execute the SQL query specified in the partition (we could even set the CommandBehavior.SchemaOnly flag to indicate that we don’t care about the data – just the schema), and then compare the resulting schema with the columns already imported in the model.
The Tabular Editor 2 CLI has a dedicated switch to perform schema checks, -SC / -SCHEMACHECK, which can be used to perform the same operation through the command line. By default, information about schema differences are outputted with one line per column. Using the -G / -GITHUB or -V / -VSTS switches, you can instruct Tabular Editor to output schema differences in a way that will be picked up as warnings/errors by a GitHub Actions or Azure DevOps pipeline.
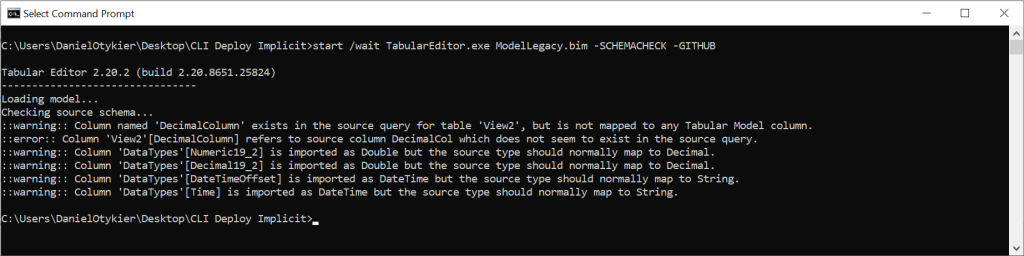
Unfortunately, these days, most tabular models do not use the legacy data sources with SQL partitions, to define the data that goes into the model. Instead, with the proliferation of Power BI, implicit data sources are now the norm, meaning the data source and query is defined using an M expression. This means that, in order to perform a schema check, one would have to somehow parse the M expression, extracting details about the data source as well as the data source object (table/view), and also figure out the consequences of any data transformations specified in the M expression. And this also glosses over the fact that the M language and Power BI supports several hundred different data sources, not just relational databases. Naturally, this is far beyond the scope of Tabular Editor 2, which is an open-source hobby project. Tabular Editor 3 on the other hand, does in fact include an M parser, but this doesn’t help CI/CD pipelines that rely on the TE2 CLI.
To be clear, the native TE2 CLI -SCHEMACHECK feature only supports legacy data sources with partitions that specify a SQL query.
C# scripts to the rescue
As mentioned above, though, there is a workaround: We can execute C# scripts as part of the TE2 CLI. Below, we’re going to use a C# script to convert any M expressions on the model into legacy SQL partitions, which are supported by the built-in schema check functionality of TE2.
However, for this script to work, we need to make a few assumptions:
- Single, SQL source: The tabular model only imports data from a single, SQL-type data source (for example an on-premises SQL Server database, an Azure SQL Database or a Synapse SQL Pool). The script should theoretically work with other relational data sources that support OLE DB connections, but this is untested.
- No transformations: There are no data transformations in the M expressions within the model. Data is imported 1:1 from tables/views in the SQL source, as is best practice (filters in the M expressions are allowed, but the schema resulting from any M transformations must correspond to the raw schema of the table/view).
- Access and authentication: The SQL data source is physically accessible from the machine running the TE2 CLI. Moreover, since the script is going to be executed as part of an automated pipeline, a Service Principal or SQL username/password account with necessary read-permissions on the SQL database, must be available.
There are three parts to the script:
- Create a (legacy) data source holding the connection details that Tabular Editor will use to connect to the data source.
- Loop through all tables that define their data content using an M expression (this could be tables with one or more M partitions, or tables that have an Incremental Refresh Policy), and replace their partitions with a legacy (SQL) partition.
- Perform the schema check.
In part 2, we use a regular expression (regex) to extract the schema and table/view name from the M expressions. This assumes that an M expression on a partition looks like this, which should most likely be the case if the assumptions above hold:
let
    Source = Sql.Databases(Server),
    AdventureWorksDW = Source{[Name="AdventureWorksDW"]}[Data],
    dbo_Customer = AdventureWorksDW{[Schema="dbo",Item="Customer"]}[Data]
in
    dbo_Customer
Specifically, we use the regex to obtain the Schema and Item values from line 4, “dbo” and “Customer” in this case (thanks to ChatGpt for helping me write the RegEx, by the way!).
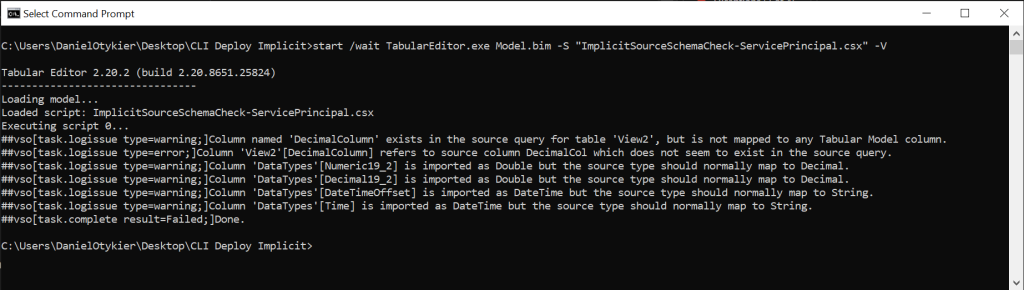
Below is the full script. After specifying your own values for the 4 variables at the top of the script (server, database, service principal application ID and secret), you can run the script directly through Tabular Editor 2’s UI, and the result of the schema check will be shown, similar to the screenshot above. Hit CTRL+Z after running the script, to undo the model metadata modifications made by it.
using System.Text.RegularExpressions;

var server = "te3synapsetest-ondemand.sql.azuresynapse.net";
var database = "AdventureWorksDW";
var applicationId = "e449df3a-957e-40ff-802f-e3fa75e43be1";
var secret = "<your-service-principal-secret-key>";

// Part 1: Create legacy data source
var source = Model.AddDataSource();
source.Provider = "System.Data.OleDb";
source.ConnectionString = string.Format("Provider=MSOLEDBSQL;Data Source={0};Initial Catalog={1};Authentication=ActiveDirectoryServicePrincipal;User ID={2};Password={3}",
    server, database, applicationId, secret);

// Part 2: Swap partitions
string mExpression;

foreach(var table in Model.Tables)
{
    // Loop through all tables that have at least one M partition, or an M Source Expression:
    var partition = table.Partitions.FirstOrDefault() as MPartition;
    if (partition != null) mExpression = partition.MExpression;
    else if (!string.IsNullOrEmpty(table.SourceExpression)) mExpression = table.SourceExpression;
    else continue;

    // Extract the schema and name of the source table/view from the M Expression:
    string pattern = @"\[Schema=""(?<schema>.*?)"",Item=""(?<item>.*?)""\]";
    Match match = Regex.Match(mExpression, pattern);
    var sourceObjectName = string.Format("[{0}].[{1}]", match.Groups["schema"], match.Groups["item"]);

    // Create a single legacy SQL partition with a "SELECT * FROM <sourceObjectName>" query:
    var legacyPartition = table.AddPartition(query: "SELECT * FROM " + sourceObjectName);
    legacyPartition.DataSource = source;

    // Delete all other partitions:
    foreach(var p in table.Partitions.Where(p => p != legacyPartition).ToList()) p.Delete();
}

// Part 3: Perform schema check
SchemaCheck(Model);
If you prefer to use SQL username/password authentication, replace the first 12 lines of the script with the following:
using System.Text.RegularExpressions;

var server = "te3synapsetest-ondemand.sql.azuresynapse.net,1433";
var database = "AdventureWorksDW";
var userId = "<your-sql-username>";
var password = "<your-sql-password>";

// Part 1: Create legacy data source
var source = Model.AddDataSource();
source.Provider = "System.Data.SqlClient";
source.ConnectionString = string.Format("Server={0};Initial Catalog={1};Persist Security Info=False;User ID={2};Password={3};MultipleActiveResultSets=False;Encrypt=True;TrustServerCertificate=False;Connection Timeout=30;",
    server, database, userId, password);

...
It is also possible to use an access token for authentication:
using System.Text.RegularExpressions;

var server = "te3synapsetest-ondemand.sql.azuresynapse.net";
var database = "AdventureWorksDW";
var accessToken = "<your-access-token>";

// Part 1: Create legacy data source
var source = Model.AddDataSource();
source.Provider = "System.Data.OleDb";
source.ConnectionString = string.Format("Provider=MSOLEDBSQL;Data Source={0};Initial Catalog={1};Access Token={2}",
    server, database, accessToken);

...
If running the script as part of a CI/CD pipeline, you may want to read the connection details from environment variables, instead of hardcoding them in the script. Luckily, that’s quite simple to do in C#:
using System.Text.RegularExpressions;

var server = Environment.GetEnvironmentVariable("server");
var database = Environment.GetEnvironmentVariable("database");
var applicationId = Environment.GetEnvironmentVariable("applicationid");
var secret = Environment.GetEnvironmentVariable("secret");

// Part 1: Create legacy data source
...
To execute a C# script as part of the command line, use the syntax shown below. This assumes that your model metadata is located in “c:\path\to\model.bim”, and that the script you want to execute is located in “c:\path\to\schemacheck.cs”. Note, you can specify multiple script files in the CLI, to have them executed one after the other.
start /wait TabularEditor.exe "c:\path\to\model.bim" -S "c:\path\to\schemacheck.cs" -Gstart /wait TabularEditor.exe "c:\path\to\model.bim" -S "c:\path\to\schemacheck.cs" -VAs can be seen from the screenshot below, the schema check is performed through the script, just as if the -SC / -SCHEMACHECK switch had been specified, but with the benefit that it works for implicit data sources. The same technique should work for models using structured data sources, with the same assumptions as above.
Updating data source references
When deploying a model in an automated way, it is quite common that data source references within the model needs to be updated. For example, the model metadata in source control may point to a development or test data source, where as when deploying the model to production, we also need to make sure that the model references the production data source.
For legacy (provider) data sources, the TE2 CLI has a native feature to update the connection string of the data source, directly through the CLI. However, this is not sufficient for structured or implicit data sources, which do not explicitly specify a connection string.
Luckily, this is easy to workaround using a C# script. It is also a very flexible approach, as the C# script has access to the entire Tabular Object Model. For example, if you use a shared M expression (also known as a parameter in Power BI Desktop) to hold the name or address of your server, changing that M expression is a simple one-liner:
var server = "te3synapsetest-ondemand.sql.azuresynapse.net";

// This assumes the existence of a Shared M Expression with the name "Server":
Model.Expressions["Server"].Expression = string.Format("\"{0}\" meta [IsParameterQuery=true, Type=\"Text\", IsParameterQueryRequired=true]", server);
Alternatively, if each of your M partitions reference a certain server name, you can write a short loop to replace the name in all of them:
foreach(var partition in Model.AllPartitions.OfType<MPartition>())
{
    partition.Expression = partition.Expression.Replace("\"old-server-name\"", "\"new-server-name\"");
}
Or, for legacy or structured data sources, simply edit the data source properties directly:
(Model.DataSources["MyDataSource"] as StructuredDataSource).Server = "new-server-address";Just as above, we can use Environment.GetEnvironmentVariable("<environment-variable-name>") anywhere in the script, to read a text string from an environment variable, instead of hardcoding values in the script itself.
To execute a script on-the-fly before the model is deployed, use the following command syntax:
start /wait TabularEditor.exe "c:\path\to\model.bim" -S "c:\path\to\script.cs" -D <target-server> <target-database> -O -C<target-server> is the SSAS or Azure AS server name, or the Power BI XMLA endpoint. It can also be a complete MSOLAP connection string, including Service Principal credentials, which would be required for unattended executions of the CLI.
<target-database> is the name of the database (dataset) to be deployed. Use -O to explicitly indicate that it is OK to overwrite a preexisting database.
For provider (legacy) or structured data sources, it is important to specify the -C switch as part of the deployment command, as shown above. Otherwise, the data source with its (updated) properties, will not be deployed. View the command line documentation for a more detailed description of the various switches used.
Adding role members
Another common requirement is to have different role members assigned to security roles in the model, depending on which environment the model is deployed to. One option is to not specify the -R / -ROLES and -M / -MEMBERS switches in the command that deploys the model, which would simply leave all roles/role members as-is. But this assumes that a deployed database with properly configured roles/role members already exists on the deployment destination. Sometimes, it is more practical to assign role members as part of the deployment pipeline.
Once again, this is easily done using a C# script. Below is how to add an Entra ID group (formerly known as an “AD group”) to a role:
var roleName = "Reader";
var groupId = "2a73590e-cf03-4db8-a8b3-7e639c0ca4de";
var tenantId = "ddec87fe-da10-4d12-990a-770ca3eb6226";

var memberName = string.Format("obj:{0}@{1}", groupId, tenantId);
Model.Roles[roleName].AddExternalMember(memberName);
To add a specific user, provide their UserPrincipalName in the script:
var memberName = "daniel@test.com"
Model.Roles[roleName].AddExternalMember(memberName);
This technique can of course be customized in many different ways, for example using environment variables, or looking up a list of users from a file, database, etc. The sky is the limit.
When performing a deployment through the CLI, while also executing this script, make sure to specify both the -R and -M switches, to ensure that the newly added role members get deployed.
start /wait TabularEditor.exe "c:\path\to\model.bim" -S "c:\path\to\script.cs" -D <target-server> <target-database> -O -R -MConclusion
As we’ve seen in this article, the TE2 CLI can be used to execute C# scripts, either as a one-off, or as part of a deployment. This provides great flexibility in setting up automated pipelines to validate or deploy tabular model metadata with small modifications, which is often required in enterprise scenarios, where one has to deal with multiple environments, etc.
We hope you enjoyed this article! Feel free to ask questions or provide suggestions for additional scripts in the comment section below.
Thanks for explanation!!!