Direct Lake Datasets: How to use them with Tabular Editor

In Microsoft Fabric, datasets have the capability to use Direct Lake mode to connect directly to data sources stored in OneLake as delta tables, which you can create with the various analytical workloads of Fabric. Datasets using Direct Lake (referred to as Direct Lake datasets) promise to yield benefits of both low latency and fast query performance, while leveraging the “single copy philosophy” of OneLake – i.e. data isn’t duplicated into the Power BI dataset. As such, Direct Lake datasets have the potential to greatly improve the value organizations can get from enterprise Power BI data models. As previewed in our Blog on Fabric this can, in our opinion, lead to a greater proliferation of datasets across an organization and Tabular Editor is to right tool to help in managing these new datasets.
Previously, you could only create and manage Direct Lake datasets within the web browser. Now, you can connect to and manage Direct Lake datasets by using Tabular Editor with XMLA Write support for Direct Lake datasets. This opens many possibilities. In this article, we introduce Direct Lake datasets and how to manage them by using Tabular Editor. A second article explains how to create Direct Lake dataset wholly within Tabular Editor 3.
What is a Direct Lake dataset?
One of the major new features that Fabric has introduced is Direct Lake. This functionality allows you to create a dataset that loads your data directly from OneLake. There is no import process, you see changes to your data the moment they are available in your OneLake.
Datasets with Direct Lake storage mode thus have DirectQuery latency, but with the performance of an Import dataset. To understand the specifics of Direct Lake please see: Learn about Direct Lake
How to Create a Direct Lake dataset in Fabric?
Fabric is the easiest place to create new Direct Lake datasets. Tabular Editor does not currently have built-in functionality for creating a Direct Lake dataset from scratch, although this is a planned feature that will be released soon. However, there are workarounds, described later in this article. As noted above, the prerequisite is to have a Lakehouse created and one or more delta tables in this Lakehouse. Once this is done, it’s straightforward to create a new Direct Lake dataset.
First, open the Lakehouse up and then click on the apply named button “New Power BI Dataset”. This will open a dialog box where you can choose which tables to have in the new Direct Lake dataset.
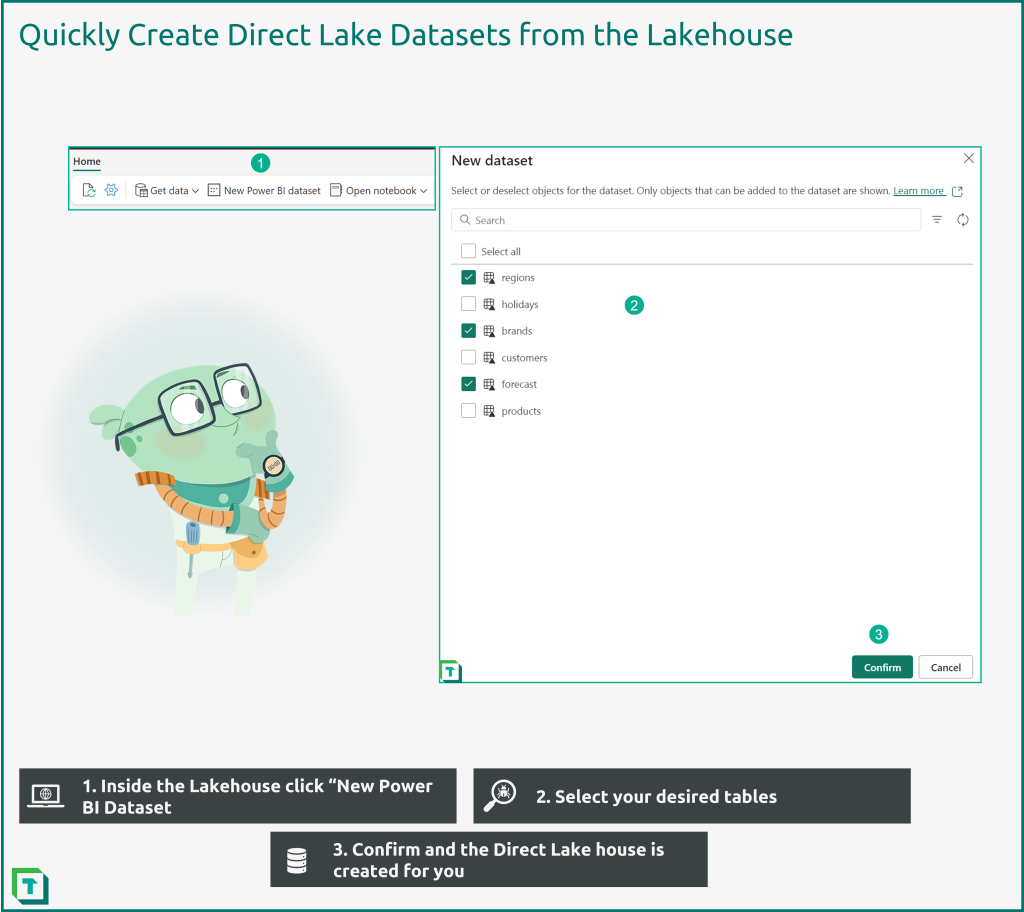
Fabric will immediately open the dataset and you can in the top corner change the name of the Direct Lake dataset. The default name is the name of the Lakehouse.
Tabular Editor 3 support for Direct Lake
Tabular Editor 3 (V3.10 or higher) supports Direct Lake datasets (As announced in the August 2023 release blog). With Tabular Editor administrating Direct Lake dataset becomes just the same as with a regular import mode dataset. Once connected to, Tabular Editor sees Direct Lake datasets as just another tabular model.
Connect to Direct Lake dataset with Tabular Editor
Once you have your Direct Lake dataset up and running in the Fabric portal the first step to using it in Tabular Editor is to connect to it. This is done in the usual manner of connecting to a Power BI dataset by using the XMLA Endpoint connection string.
Step I: Find Connection String
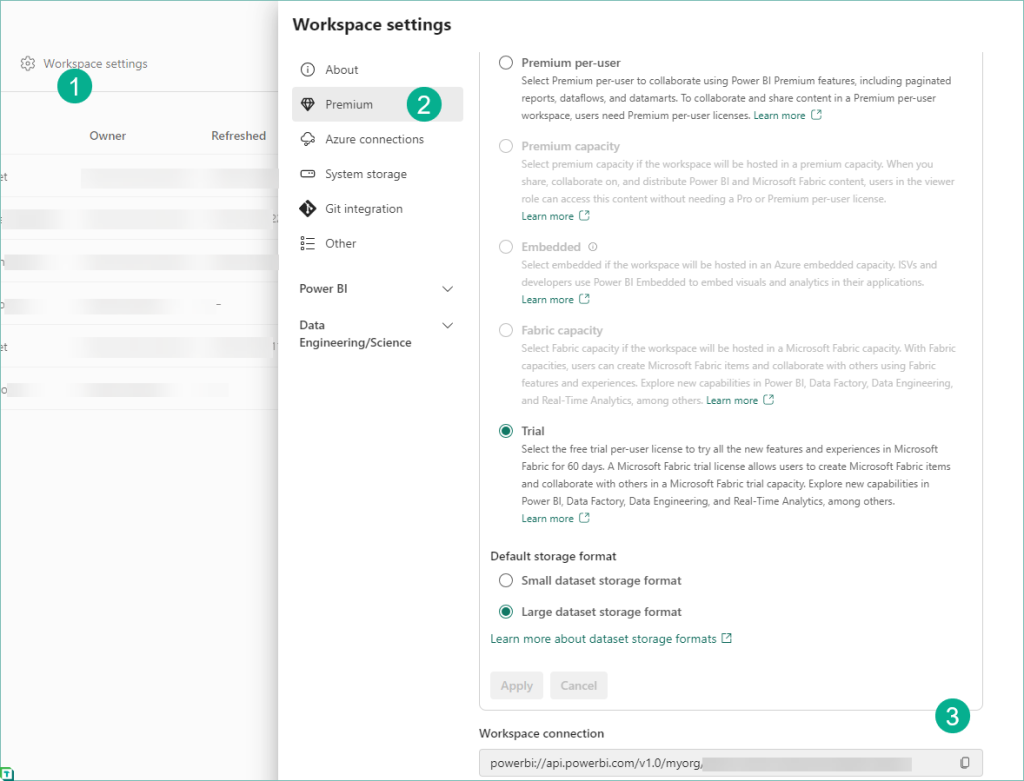
You’ll find the connection string by entering Workspace settings > Premium > Workspace connection in your Fabric Workspace.
Steps to find XMLA Connection string:
- In your Fabric workspace, select Workspace Settings
- Select Premium
- You will find the XMLA workspace connection string in the bottom right of the page.
Step II: Open dataset in Tabular Editor 3
With the connection string in hand, the workspace can be opened in Tabular Editor and choose the dataset to edit. In our example there are two datasets, one being the default dataset and the other the one we created in the previous section, renamed through the portal to Direct Lake Test Dataset.
The dataset that is named like your Lakehouse is the default dataset, in this case Direct_Lake_Test, and cannot be edited. But any other dataset can be opened by Tabular Editor or other tools.
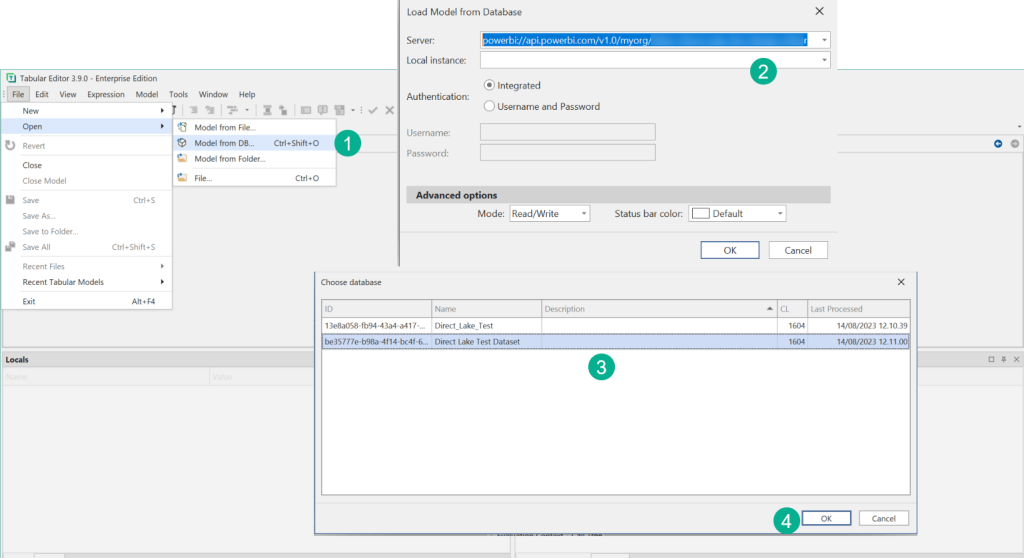
- Go to File > Open > Model from DB
- Paste the XMLA Connectionstring into the server name
- Choose your Direct Lake dataset
- Click OK to open the Direct Lake dataset in Tabular Editor
Step III: Edit the dataset
Now that the dataset is open, you can start editing and saving the dataset back to the service.
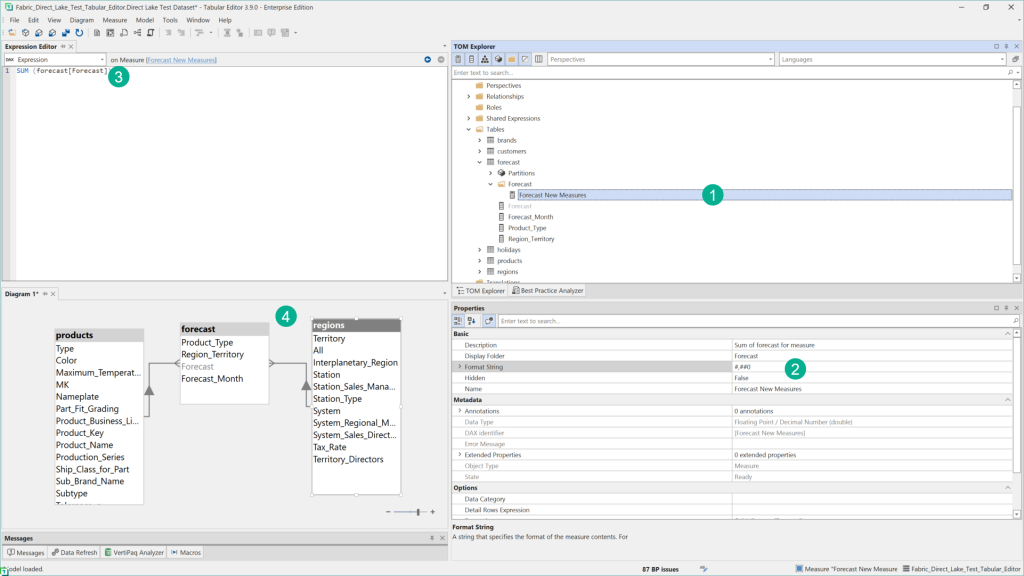
You can now explore the dataset in Tabular Editor. For example, it’s possible to:
- Add measures
- Add Tables through Import Wizard
- Change object properties
- Write DAX
- Create Diagrams
- and leverage the functionalities of Tabular Editor
Step IV: Import a New Table
Support for table import wizard with Direct Lake dataset is the main feature that was released in Tabular Editor 3.10.0. The wizard connects to the Direct Lake SQL endpoint and supports adding new tables to the Direct Lake dataset. Let see how this works by adding a new table to our dataset:

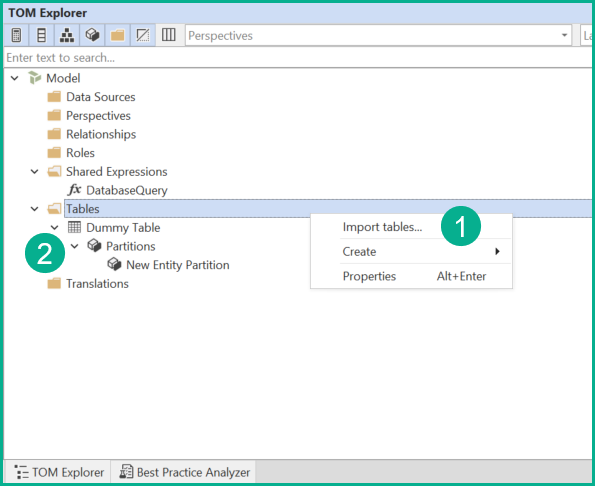
- Right Click on Tables folder and select “Import Tables”
- Select the existing source
- Choose the table(s) to import
- Table is imported and can be edited and organized in Tabular Editor 3
The Update Schema functionality shown in the first picture of the infographic is also supported in Tabular Editor 3.10.0 and higher. This is the easiest way to import new columns to existing tables.
How to identify a Direct Lake dataset?
But how does a Direct Lake Dataset differs from “regular” dataset in Power BI? Generally, everything looks similar to a normal import dataset, except for its partitions and having minimum compatibility level of 1604.
The partitions are so called Entity Partitions where the Mode property is set to DirectLake. The key here is that all the partitions in the dataset must be a Direct Lake dataset for the dataset to be valid. This is bascially also the way that Tabular Editor knows if you are working on a Direct Lake dataset

Building a Direct Lake from Scratch in Tabular Editor 3
In Tabular Editor 3 (V. 3.10) it’s not yet possible to create a Direct Lake dataset directly from Tabular Editor by just using standard functionality. Until this is made possible, there is a workaround by which you can create your own Direct Lake dataset solely from within Tabular Editor.
Step I: Create New Model
Start out by creating a new model in Tabular Editor and then manually update the compatibility level to 1604, which is required for Direct Lake datasets:

- Go to File> New > Model
- Name and create the model. In the Compatibility Level text box, type 1604 (replacing the default 1601).
Step II: Create Shared Expression to SQL Endpoint
The next step is to create a shared expression that the model can use to connect to the Fabric Lakehouse SQL endpoint with. Start out by going to the Fabric workspace and find the SQL Connection endpoint for your Lakehouse or Warehouse and copy it and then use the bellow code in a new shared expression.
let
    database = Sql.Database("[SQL Endpoint Connection String]", "[Name of Lakehouse]")
in
    database
- Navigate to Fabric Workspace and click on the SQL Endpoint
- Choose SQL Endpoint settings.
- Copy SQL Endpoint Connection string and save it for step 5.
- Create shared expression in Tabular Editor. You can name it as you please, the default name used by Microsoft is “DatabaseQuery”
- Copy the M Expression code block above and replace [SQL Endpoint Connection String] with the saved SQL Endpoint
- Enter the name of your Lakehouse instead of [Name of Lakehouse] in the shared expression
The shared expression now points to the Lakehouse’s SQL Endpoint and can, almost, be used to import tables with, but there is a quick extra step before that.
Step III: Create Temporary Direct Lake Partition
Now this next step is where a little bit of manual effort is required. To set the dataset up as Direct Lake and import our tables, first create a temporary table with a Direct Lake partition. In the previous section, we saw that alle the partitions in a Direct Lake dataset needs to have certain properties, and to import new tables, you must ensure that the new model is seen as a Direct Lake dataset by Tabular Editor.

- Right click on the tables folder > Create > ‘Table’
- When prompted select the M partition option. This is, actually, the wrong type of partition for Direct Lake that Tabular Editor has created, but this is the only option from the user interface.
- The next step is therefore to create a new Entity Partition in the temporary table that you just created in step 1.
- Set the Entity Partition up as a Direct Lake partition by changing the Mode property to Direct Lake
- And setting the Expression Source to the shared expression name.
Step IV: Import Tables from Direct Lake
Once the temporary table exists, Tabular Editor recognize the model as a Direct Lake dataset. The Table Import Wizard can now correctly import new tables with Direct Lake partitions. But before moving on with creating measures and developing, remember to delete that temporary table we created previously.
- Import tables from the Lakhouse
- Delete temporary table once the first table import is done
Step V: Save/Deploy your Direct Lake dataset to Fabric
The dataset can now be saved or deployed to the Fabric workspace and will work just like any other Direct Lake dataset. Try for example to Preview Data from a table and watch Tabular Editor show your data. And notice no refresh was needed to get the data into the dataset. Pretty neat!
In conclusion
Direct Lake introduces a whole new dataset mode that opens all kinds of exciting prospects for BI developers.
As shown, Tabular Editor works easily with Direct Lake datasets. In the next Tabular Editor blog post on the subject, we’ll dig into some of the scenarios where Tabular Editor can make a difference for developers managing Direct Lake datasets.