How to set up and use Fabric Git integration for your semantic models, and use it with different client tools and metadata formats (like TMDL).
To track and manage changes to your model during development—and to enable better collaboration— you should use source control.
When you develop your model with Tabular Editor, you typically work with metadata files like the model.bim, database.json, or TMDL formats, which allow you to view and manage changes.
For example, two developers can work at the same time on separate branches (or copies) of the model, then merge those branches (and their changes) to a single version in a remote Git repository, like in the Azure Repos service of Azure DevOps.
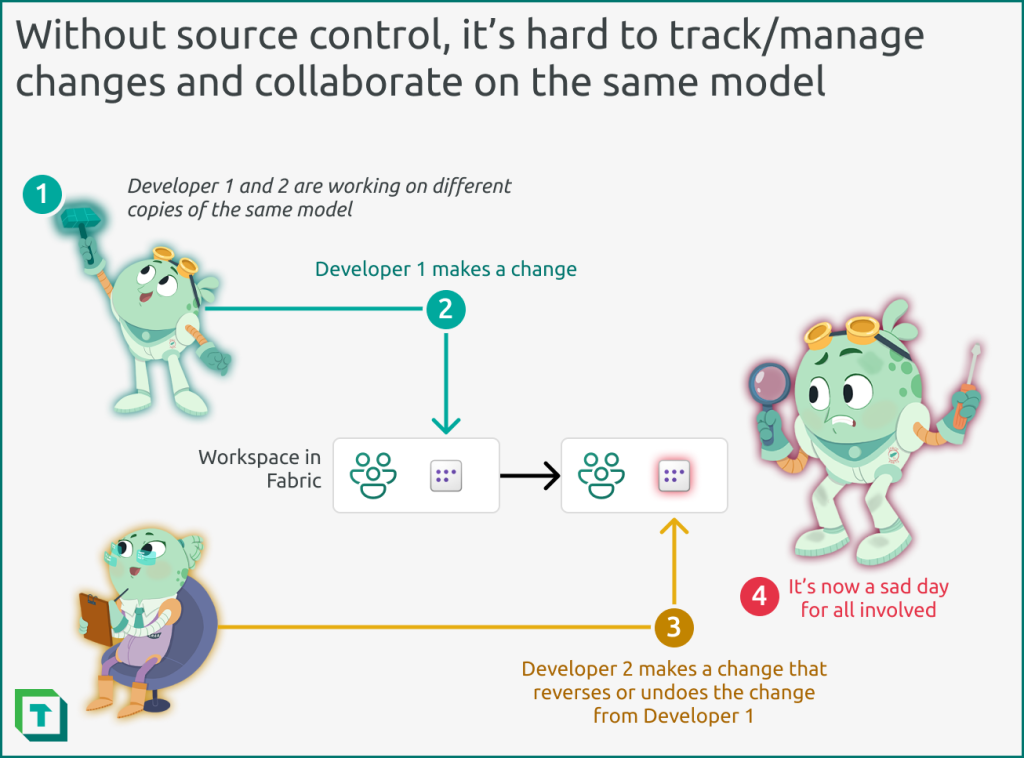
Figure 1: Without source control (or version control) it’s difficult to track and manage changes, and collaborate. For instance, if two developers are working asynchronously on separate copies of a semantic model, one developer might make changes (3) that overwrite changes of another (2), which causes regression, confusion, and bugs in data and reports for business users; a sad day for all involved (4). You can use source control to improve this.
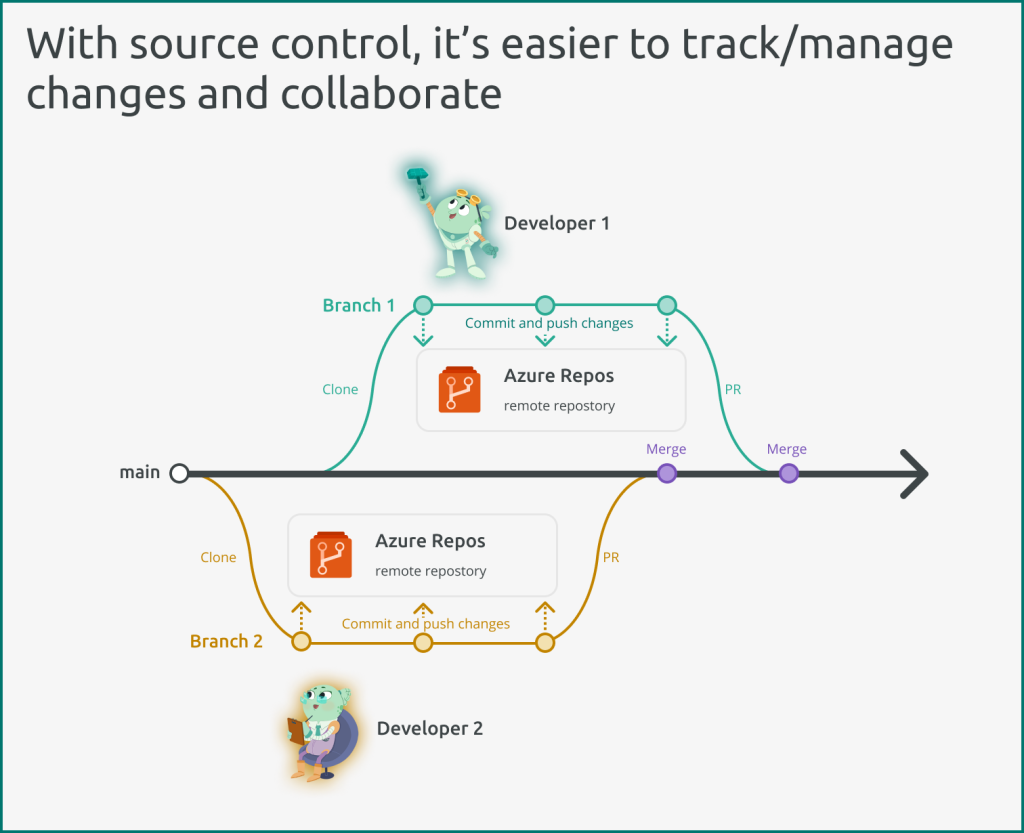
Figure 2: With source control, it’s easier to track and manage changes, and collaborate on the same model.
Microsoft Fabric also supports Git integration for your semantic models. This means that a Fabric workspace can synchronize with an Azure Repos Git repository, to automatically update with the latest content changes present in that remote repository. You can also write changes to the Fabric workspace (either via Tabular Editor or web authoring of the data model) and then commit those changes to the remote repository straight from the workspace.
This article describes how you can set up and use Fabric Git integration together with Tabular Editor for your Power BI semantic models, irrespective of what storage mode or model metadata format you decide to use.
Step 0: Pre-requisites for Git integration
To use Fabric Git integration, you must have the following pre-requisites depicted in the diagram.
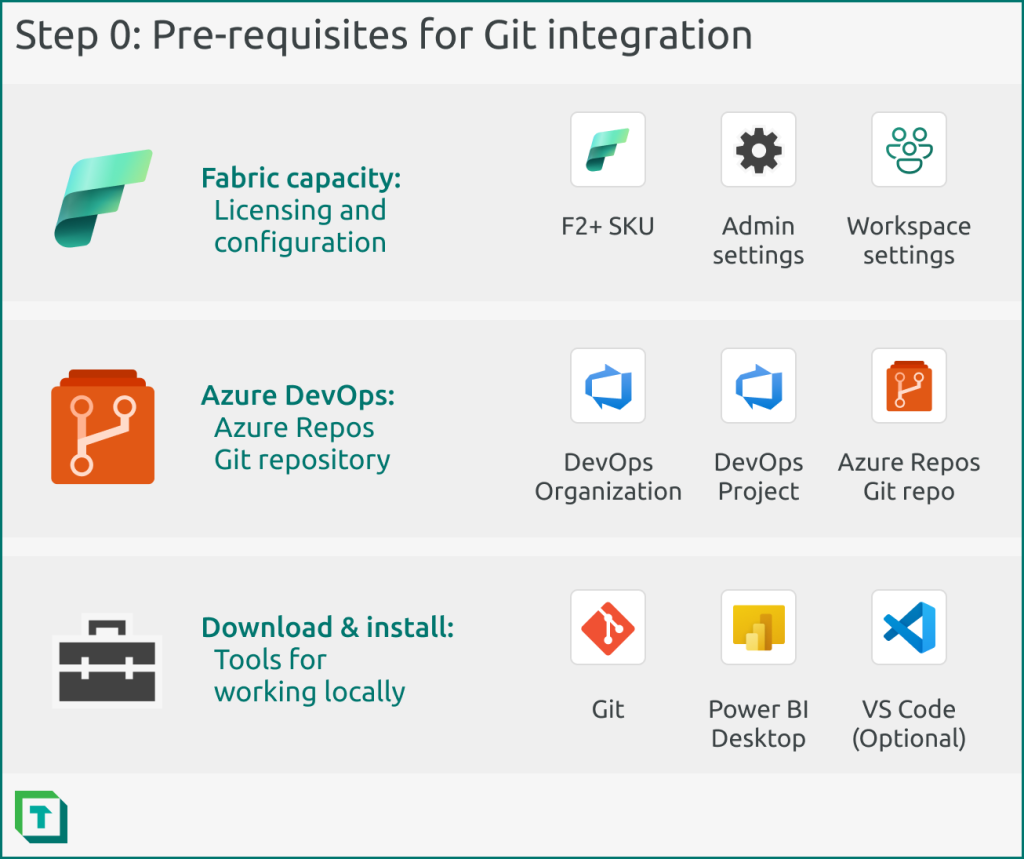
Figure 3: To use Fabric Git integration, you need certain pre-requisites to be fulfilled. Specifically, for your Fabric capacity, an Azure Repos Git repository, and some local tools if you want to support local development.
Fabric capacity
Git integration is a feature only supported in Fabric. As such, you must have a Fabric capacity (F2 SKU or higher). This feature also works with trial capacities. Additionally, you need to have the following admin settings enabled for users who intend to use Fabric Git integration (the latter two aren’t necessary). Click the links for information from Microsoft Learn about these tenant settings.
- Users can synchronize workspace items with their Git repositories.
- (Optional) Users can export items to Git repositories in other geographical regions.
- (Optional) Users can export workspace items with applied sensitivity labels to Git repositories.
Additionally, you need to configure your workspace to use the Fabric capacity and some additional settings.
- Git integration: You must connect your workspace to a branch of the Git repository (see the Step 1 for a description of this)
- (Recommended) Premium > Default storage format: It’s recommended that you set the default to large semantic model storage format. This format supports more performant XMLA write operations.
- (Optional; TMDL) Power BI > General > Data model settings > Users can edit data models in the Power BI service: This option appears to be necessary for the workspace to export the model metadata as serialized TMDL format, at least during public preview.
Azure DevOps
To use Fabric Git integration, you must have an Azure DevOps organization, and a project within that organization. You should have sufficient rights to manage (or create) an Azure Repos Git repository. This repository will contain the metadata files for your model, or other supported Power BI items like reports or paginated reports (or Fabric items like notebooks).
Download and install tools for working locally
If you intend to develop your content locally and then commit your changes to the Git repository from your machine, you require additional software.
- Git: You must install and configure Git in order to commit your local changes to the Git repo. Ensure that you set up Git to use your credentials once
- Power BI Desktop: If you intend to develop models or reports in Power BI, you must install a version of Power BI Desktop that supports the Power BI Projects (.pbip) save format. If you intend to only develop models and reports by using Tabular Editor or web authoring, you don’t need Power BI Desktop.
- VS Code: If you want to view and manage your changes from a user interface, you can use a tool like VS Code. This is the easiest way to stage and commit changes, among other operations. Alternatively, you can use the Git command line, if that’s what you’re comfortable with. If you’re new to Git and source control, you should use a tool like VS Code, however, as it will be easier.
Once you’ve met these pre-requisites, you can proceed to set up the Git integration for your semantic model.
Step 1: Connect workspace to Git repository
In the workspace settings, you should connect your workspace to the Git repository that you created in Azure DevOps.
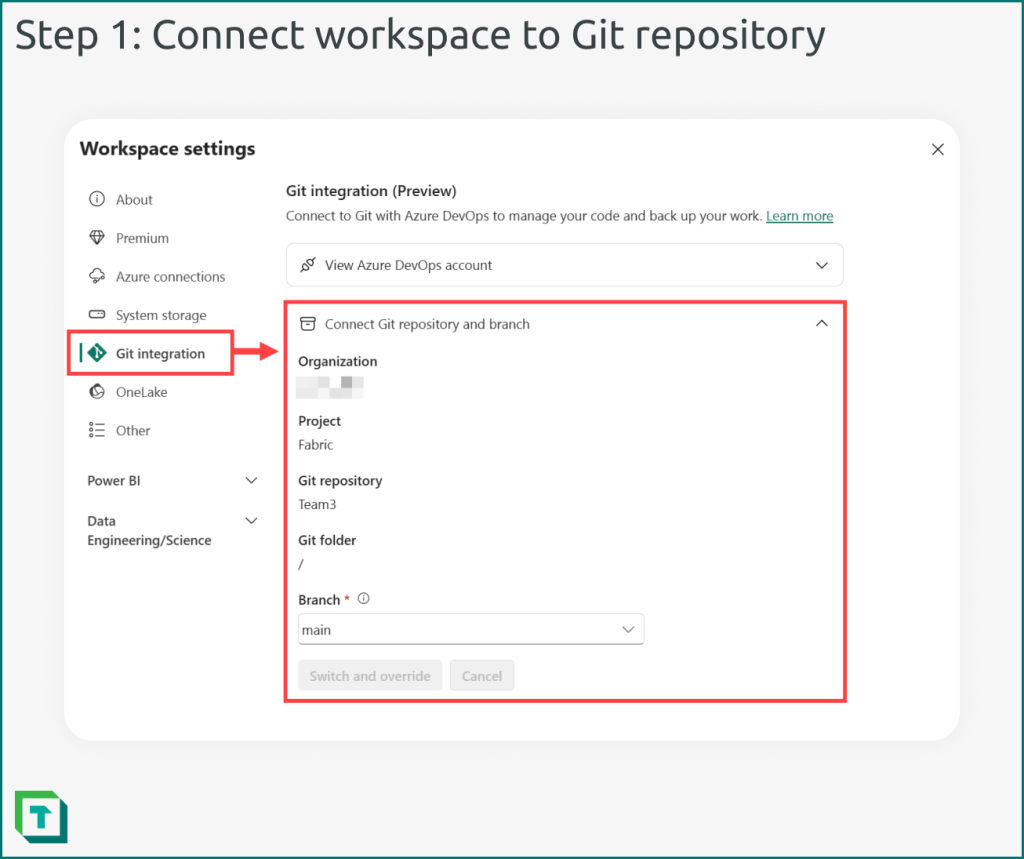
Figure 4: You must connect a workspace to a branch (and optionally a folder) of your Git repository. You can switch branches without needing to disconnect/reconnect (thus with no risk to losing content).
Step 2: Create model and optionally enable TMDL
Now, you should either connect to your existing model or create a new model. Optionally, you can enable the new Tabular Model Definition Language (TMDL) format in either Power BI Desktop (for .pbip files, which are required if you use Power BI Desktop) or Tabular Editor.
TMDL is an alternative to the .bim format (sometimes referred to as TMSL). TMDL provides better visibility of changes and an easier time to review pull requests and perform merges (or resolve merge conflicts).
The following diagram illustrates the actions you take to enable .pbip format and/or TMDL format.
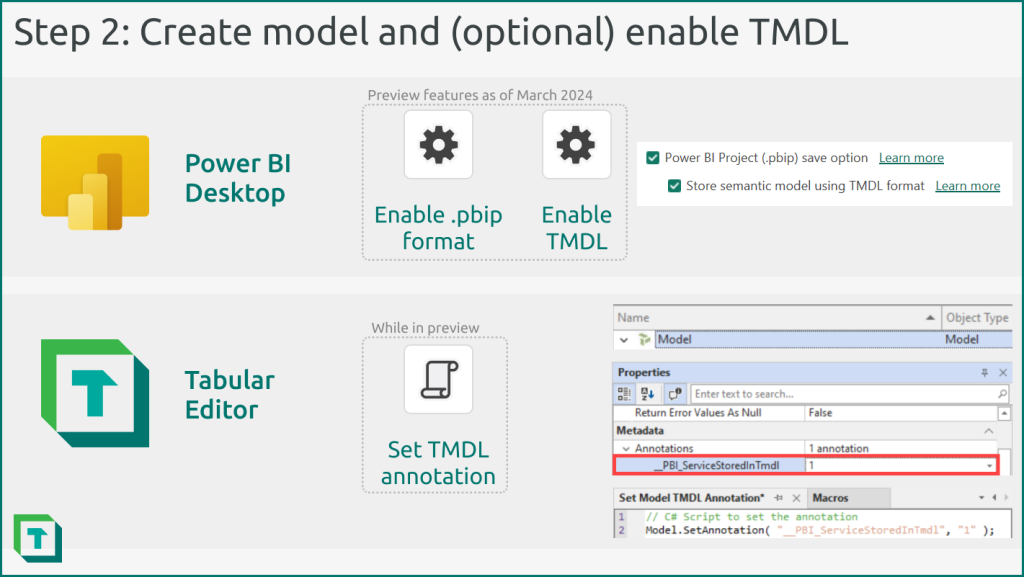
Figure 5: In Power BI Desktop, you must enable the .pbip format to use Git integration. You can also optionally enable the TMDL format, which provides better visibility of changes. If you’re using .pbip files, you should enable TMDL. In Tabular Editor, you can choose TMDL as a default serialization format. However, if you want the Power BI service to store your models in TMDL after you deploy them with Tabular Editor (via the XMLA endpoint) you need to set a model annotation called __PBI_ServiceStoredInTmdl. It doesn’t matter what the value is of that annotation; it just can’t be empty. elationships from the model diagram view, the TOM explorer, or a C# script.
Step 3: Perform the initial commit of your model
To get your semantic model into the remote repository, you have different options, depicted in the following diagram.
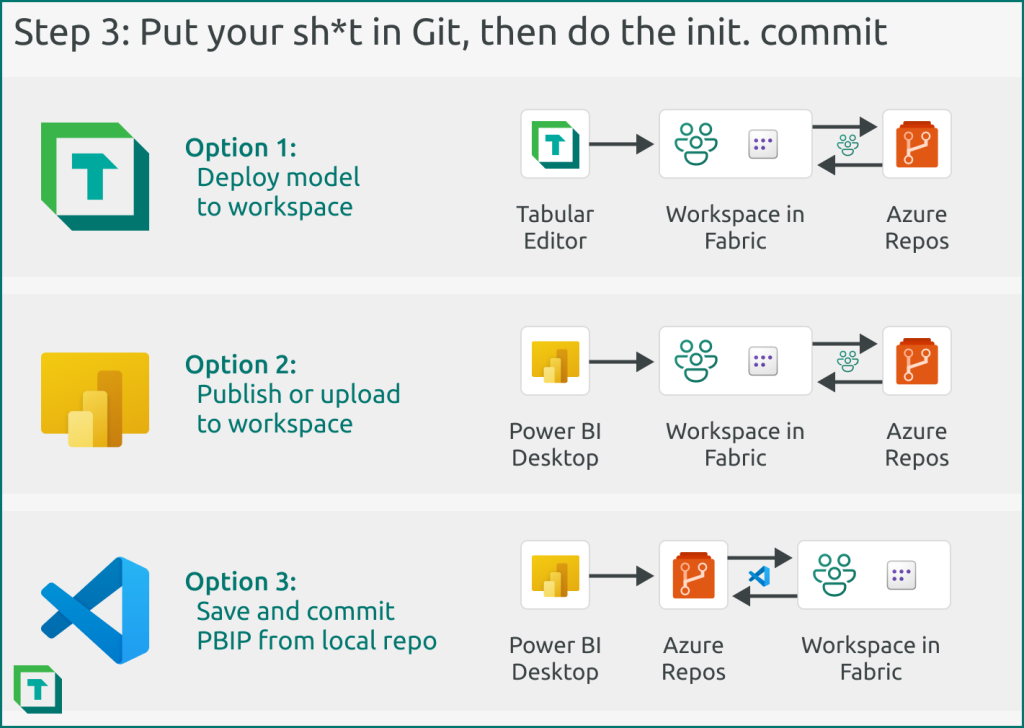
Figure 6: You have three different options to perform the initial commit and push to get your model into the Git repository when you use Fabric Git integration.
The options are as follows:
- Option 1: Deploy model to workspace. Here you deploy the model by using Tabular Editor, and then commit the model from the workspace to the connected Git repository. With this option, you will not be able to open the model in Power BI Desktop locally without additional steps. That’s because Fabric doesn’t currently automatically create the necessary full .pbip folder structure when you publish a model to the service.
- Option 2: Publish or upload to workspace. Here you publish the model by using Power BI Desktop or upload a .pbix to the workspace. You then commit the model from the workspace to the connected Git repository. With this option, you also will not be able to open the model in Power BI Desktop, for the same reason as option 1.
- Option 3: Save and commit PBIP from local repository. Here you save a model from Power BI Desktop as a .pbip file (with or without TMDL enabled) to your local repository; a local copy cloned from the remote repository in Azure Repos. You then commit these files to the remote repository either using the command line or a tool like VS Code. If you use option 3, you will be able to work with the model by using Tabular Editor or Power BI Desktop, with no additional steps required. That’s because Option 3 is the only one that adds the necessary files for Power BI Desktop to open the model metadata (namely, the .pbip file and other supporting contents). Option 3 is thus the most flexible approach.
The following diagram depicts the user interface when you commit either from the workspace or VS Code. Note that the workspace contains only the model, whereas the commit from VS Code also contains a connected report. That’s because it’s currently not possible to develop only a semantic model with Power BI Desktop; it always has the connected report.

Figure 7: You can commit either from the workspace (if you deployed or wrote your changes there first) or from your local repository (if you saved your changes to the local repo).
Step 4: Develop the model and perform regular commits
Essentially, you can now continue working like you normally would. However, you now need to ensure that you regularly batch and commit your changes to the remote repository. You can do this in different ways depending on the tool you use and your preferred process, as depicted in the following diagram.
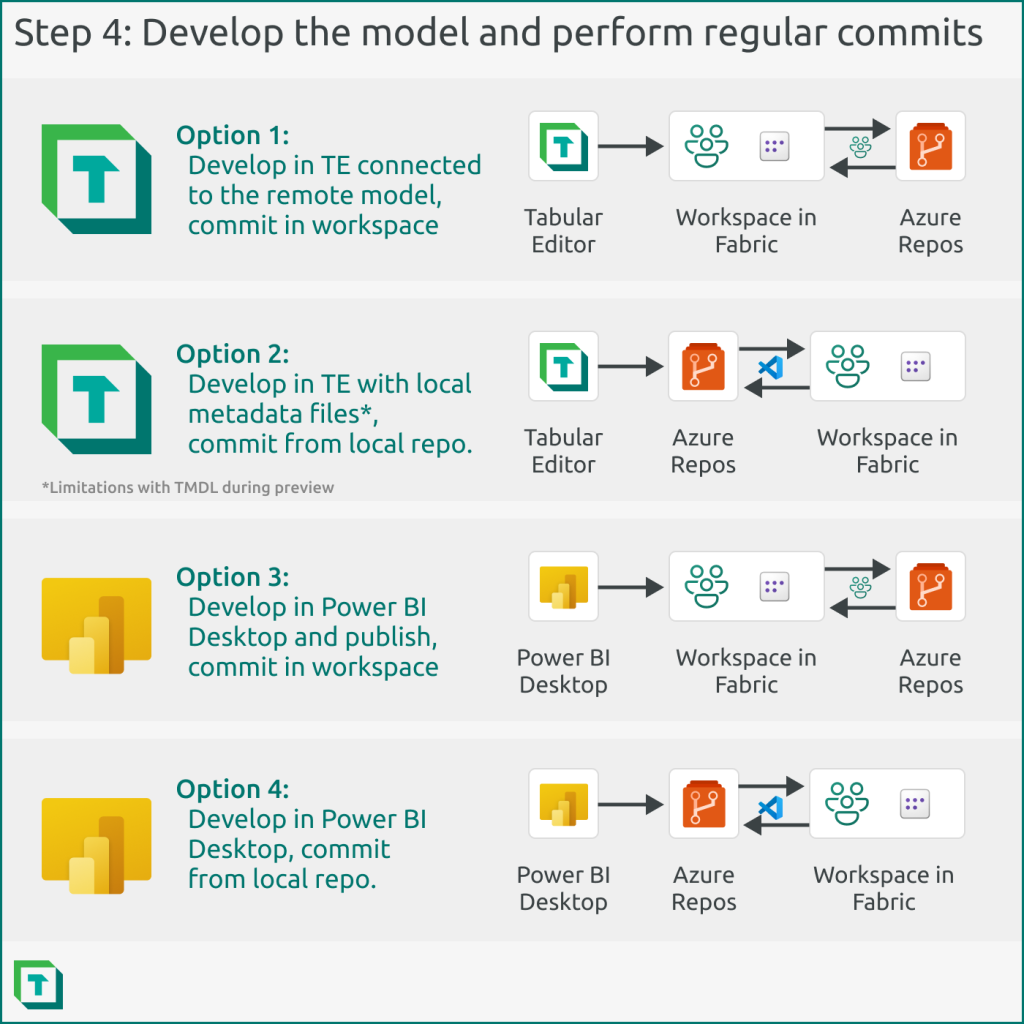
Figure 8: You can develop your model in Tabular Editor, Power BI Desktop, or a combination of the two. You can write your changes either directly to the workspace, and make your commits there, or save your changes to a local repository, then commit and push those to the remote repo and sync it with the workspace. Note that you can’t make local changes to TMDL files locally, as some changes will make the files unreadable by the workspace upon sync; instead, if you are using TMDL with Tabular Editor during the TMDL public preview, write your changes directly to the workspace and perform your commits, there.
In summary, the diagram outlines four possible options:
- Option 1: Develop in Tabular Editor, connected to the remote model, and commit in the workspace. In this option, you save your changes from Tabular Editor to the model in the workspace, directly. You then perform your commits from the workspace. This option is preferred if you want to develop in Tabular Editor and also query the model with DAX Queries.
- Option 2: Develop in Tabular Editor with local metadata files and commit from your local repository (i.e. with VS Code). In this option, you are not connected to the remote model. Instead, you’re working only with the local metadata files (and thus can’t query the model). Your changes arrive to the remote model only once you’ve committed and pushed them to the Git repository.
- Option 3: Develop in Power BI Desktop and publish, commit in the workspace. In this option, you proceed like you would normally, and “batch” your updates by publishing to the workspace, where you commit your changes. You can also use Tabular Editor as an external tool for the model in this approach.
- Option 4: Develop in Power BI Desktop and commit from the local repository. This option is similar to option 3, except you don’t publish. Instead, you view and manage your changes from i.e. VS Code and then commit and push these changes from to the Git repository. Afterwards, you synchronize your changes with the workspace. This approach is preferred over option 3, because you have visibility on your changes and more control of how you stage and commit them.
To reiterate, how you work with source control largely depends upon your processes and preferences.
Step 5: Decide upon a workflow to use Git integration
The above steps 1-4 outline how to set up and use Git integration. However, the most challenging part of performing source control effectively is having a good process that everyone on your team follows.
With Git integration, it means that you need to align your branching strategy with how you plan and set up your workspaces, as one workspace can only be synchronized with a single branch (however you can switch which branch it synchronizes with, for instance if you want to use release branches for your content).
For instance, the Microsoft documentation suggests an approach to use a “personal” or “private” workspace for individual developers, where the developers work on separate branches. They merge their changes to a consolidated branch, like the main branch.
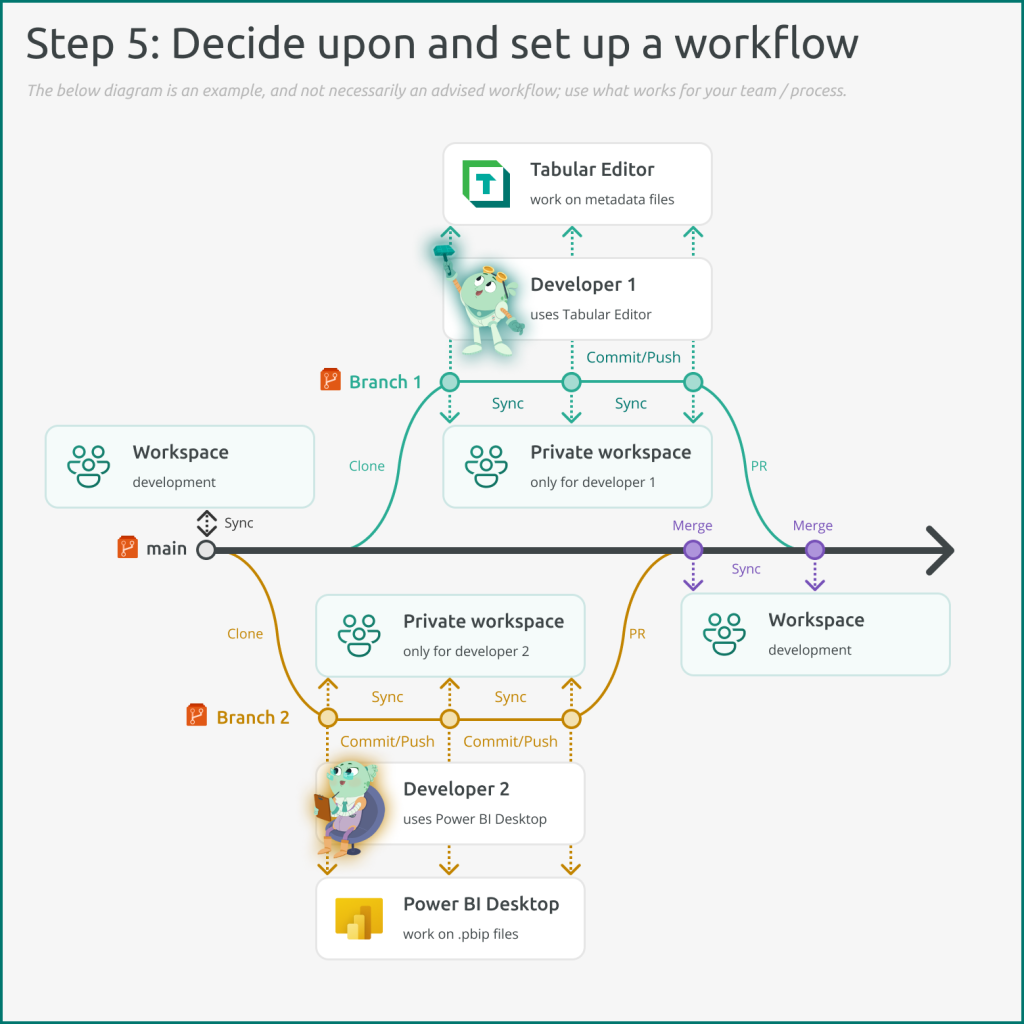
Figure 9: One possible way to use Fabric Git integration is to have dedicated private workspaces for developers to use with their own branches. These workspaces allow these developers to create and test content like semantic models using their tool of choice, either Power BI Desktop or Tabular Editor or web authoring in the Fabric portal. Then, in Azure Repos, the developers open a pull request (PR) to have the changes reviewed and merged into the main branch, which synchronizes to a dedicated development workspace. From there, the team can use deployment pipelines to shuttle the model onwards for testing and quality control, then release to production.
To reiterate and emphasize: source control is only as effective as its underlying process, and how well people adhere to that process. Getting value from something like Git integration requires that you have a clearly defined way of using it that helps you and your team be more effective. For instance source control can help you to collaborate or enable use-cases for your semantic models, like automated validation or rollback to previous versions in the event that proverbial moon rocks hit the fan.
In conclusion
Git integration is a feature long awaited by enterprise Power BI teams, or teams who just want to better track and manage changes or collaborate on the same model. You can use Git integration with both Tabular Editor and Power BI desktop–even interchangeably. With the new TMDL format, you also have better visibility of what changed, and a smoother experience to manage and merge those changes. In the future, you will also be able to use Tabular Editor to create and manage Direct Lake models, either those which use .bim or TMDL metadata formats.
Congratulations for the article Kurt,
A quick question: In the case of a centralized dataset/datamodel that has been modified using a feature branch approach on a personal developer workspace.
How can we test effectively the impact on the existing reports using that model? I mean, what steps would your recommend to test the behaviour of the reports using the new version of the model?
The obvious option would be to open the reports on PBI Desktop, change the connection and upload them to the service. Then test the report and if it worked fine revert the change. This process seems a bit messy. Do you have any idea to speed it using TE?
Thanks
Hi Alfons
First off, sorry for the late reply.
In general I do not believe there is any good way to automatically test how reports behave with a new version of a model.
I would suggest having deployment pipelines set up and then test the reports in your test workspace with the test model before pushing to production.
Tabular Editor does not have a built-in way to access the visual layer of a report.
To test the model itself it could be worthwhile using DAX Queries to for example validate results across models.
John Kerski’s blog has a lot of ideas for different DataOps implementations around Power BI: https://www.kerski.tech/
Great article/format as always.
It works for PPU licenses also. Apologies if it is mentioned elsewhere, I just skim-read the article, the diagrams had most of the info I needed.
This is a great article.
If you allow Tabular editor to perform GIt commands you will take the app to another level